
Return to Antarctica
- At October 26, 2013
- By John
- In Antarctica, Gear
 1
1
What Equipment will I take his time?
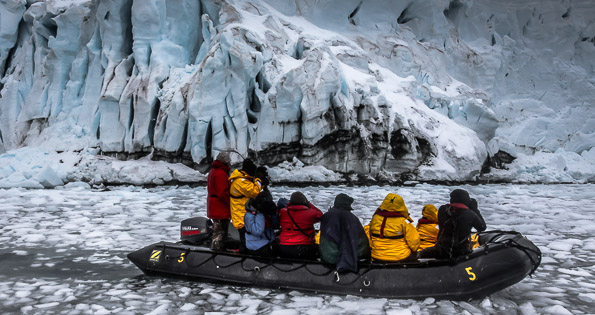
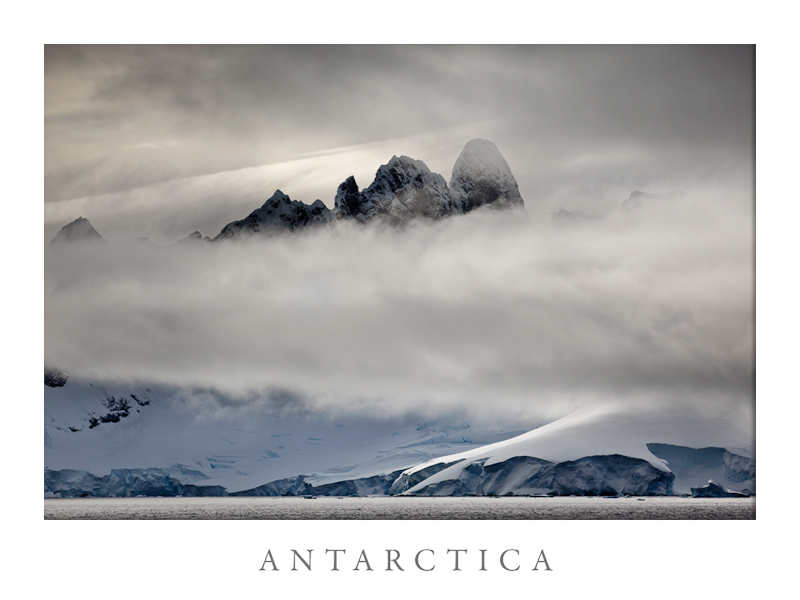
In late January 2014 I hope to return to Antarctica, this time avoiding the dreaded seasickness of the Drake passage by flying to King George Island from Puntas Arenas in Chile, before boarding the Ocean Nova. So what equipment will I be taking this time and what lessons did I learn from my trip two years ago?
Camera Bodies
The last time I travelled with two 5D mark-II’s, having purchased a second body just prior to my departure. Relying on just one body seemed far too risky for a trip of this nature and rumours of some 5D-II’s failing on previous trips, falling foul to the damp wet weather, did cause concern about their reliability. Thankfully mine came through in fine fettle despite the exceedingly damp, overcast conditions, but one did succumb in similar conditions in Iceland several months later. I also found two bodies quite advantageous when shooting from the decks of the ship; one kitted out with a longer lens, with the other a wide angle zoom. Having two cameras around ones neck can be a bit of a hassle, so having at least one of the bodies fitted with a sling style strap is almost a pre-requisite so highly recommended.
I had planned to sell the second 5D-II body upon my return to the UK but that never transpired and it was eventually traded in against a brand new 5D-III. The mark-III is a far better performer than the mark-II in terms of focusing, and higher ISO, and has that all important weather sealing, so I’m now contemplating upgrading my remaining 5D-II to the mark-III for my return trip.
Lenses
I took more lenses than I really needed last time around, but since I may face far stricter weight restrictions this time, I’m planning to cut down next trip. The lenses on my first trip included:
- EF 16-35mm F/2.8 L USM zoom
- EF 24-105mm f/4 IS L zoom
- EF 300mm f/2.8 IS L
- EF 70-300mm f/4.5-5.6 IS L
- TS-E 24mm f/3.5 MII
You may think this a rather odd selection of lenses to bring, but the trip included a few days in Patagonia, for which I’d included the tilt and shift lens. However, there was at least one professional photographer onboard who used a TS-E 24mm whilst in Antarctica. I never did.
I found a lot of the people shooting from the deck of the ship (and some from within the zodiacs) often carried two cameras at once, one equipped with a long zoom and the other with a utility zoom lens. I ended up doing the same and found it very useful whilst especially when cruising. With encouragement from Seth Resnick, one of the workshop instructors, I also rented a EF 300mm f/2.8 lens. This is a super sharp lens, and one of the best in Canons arsenal, but personally I found it a little too heavy and bulky to shoot successfully hand-held, especially from a zodiac, unlike Seth who used his all the time but has much better technique and experience handling this lens. Most of the photography on this trip was hand-held from zodiacs or from the decks of the ship, often in gloomy, dull, overcast weather, so lenses with IS or VR were certainly worth their weight in gold.
Most of my shots were taken with the EF 24-105mm f/4 and the EF 70-300 f/4-5.6L IS USM lenses. The later is a superb, very sharp zoom lens that’s very easy to handle, thus I found it far more useful than the EF 300mm f/2.8 so the difference in sharpness shooting hand-held became negligible. The EF 24-105mm f/4 is not the sharpest zoom in the Canon range, and probably the weakest in my lens selection. However the 24-105mm zoom range actually made it probably the most useful and eventually the most used lens when shooting from the zodiacs. I also took a 16-35mm wide angle zoom and a 24mm T&S lens but neither saw much use in Antarctica. Both were used in Patagonia afterwards however. I regret not trying the EF 16-35 mm f/2.8 much from the deck of the ship, as at times we got so close to some huge icebergs that a really wide angle lens would have been the better choice, and other photographers bagged some great shots where I missed out.
For this trip I’m planning on taking the following.
- EF 16-35mm F/2.8 L USM
- EF 24-105mm f/4 L IS
- EF 24-70mm f/4 L IS
- EF 70-300mm f/4.5-5.6 IS L
You’ll notice the absence of primes. Shooting hand-held from zodiacs bouncing around in the water really renders any advantages in sharpness from a prime lens almost useless. Unless of course, you have great technique. I’d much rather have IS lenses and the ability to reframe as best as possible. For me the zooms are just more practical on a trip of this nature. Added to my lens selection this time around is the new EF 24-70mm f/4 IS L zoom which out performs my 24-105mm hands down. However, the later is still there for backup. I could have gone for the new 24-70mm f/2.8 which is sharper (not by much), but it lacks the all important IS.
Shooting Techniques
One major regret was that we were given very little guidance from the course instructors on shooting techniques. This was really disappointing as it took me a good couple of days to get reasonably comfortable shooting hand-held from zodiacs. My approach was initially more akin to landscape photography, and my own inability, trying to shoot with apertures of f/11 or smaller to maximise depth of field, when really f/8 was quite sufficient. I also should not have been afraid to have used higher ISO settings either, rather than trying to keep below ISO 400, which unfortunately resulted in many of my earlier attempts lacking in sharpness and so few keepers. In this respect the 5D-III should prove a much more capable camera under these conditions with its far superior high ISO performance and I wouldn’t really worry that much shooting from 800-1600 ISO if necessary.
We had pretty overcast weather almost throughout our Antarctic trip but even then you still needed to compensate around +1-1/3 to +1-2/3 stops for all the white snow. Shooting in aperture priority mode seemed the most logical method to adopt and this worked best for me. On the few occasions I used the tripod during onshore landings I may have used manual mode.
There were 73 photographers on our trip, and at times shooting from the decks was more like paparazzi at a film premier, with the sound of shutters rattling off in machine gun like bursts at time. I’m sure some must have shot on auto-drive with their finger continually pressed on the shutter button at times. God knows how many memory cards they must have got through. Unfortunately I too, got pretty wrapped up in this style of shooting at times, thinking it was the thing to do, and I really wish I’d put a bit more thought into my compositions at times, and taken a more time to fully evaluate the scene before me rather than the smash and grab technique favoured by many. This time I’ll be far more selective.
Shooting from zodiacs bouncing around in the zodiacs was a steep learning curve and something completely new to me. You’ll just have to practice at that, and try and keep the shutter speed high enough. That’s why I find IS lenses so invaluable. One thing I will say is that don’t be afraid to instruct your helmsman to slow down and make a repeat pass if you don’t get the shot. I was just too dam polite to start off with!
Tripod
I took my Gitzo GT 3541-LX tripod but it didn’t use that much use. It was used on some Island landings for landscapes shots, and it was definitely needed as the light was often poor. It wasn’t much use in the snow however which is very deep, so if you do plan to use one some snow feet may be a wise investment. Not many of the photographers took tripods but I much prefer to use one when I can. I was tempted to take a light weight tripod or even just a monopod but it was pretty dam windy in places, so a sturdy tripod was perhaps a better choice, but bulky of course. I’m going again in January, this time flying to King George Island and will take a tripod, although I’m going to have much tighter weight restrictions this time.
Surprisingly I saw no monopods used on our trip, but there again they are probably not that advantageous shooting from the deck of a ship, and of no use in the snow (unless with a snow-shoe), but they have got to be better than hand holding, especially if using a heavy long lens. I did actually try using EF 300mm f/2.8 on the tripod from the deck of the ship, occasionally with extenders too. In each case I had the head loosened and used it gimbal-style. I’d seen Art Wolfe do this on Travels To The Edge and it works pretty well providing you’re cruising smooth waters. Well worth a try.
Backback
I took my rather large Lowepro Pro Trekker 400 AW photo backpack, but this proved too bulky and really too awkward for use in the zodiacs. Eventually I gave up and ended up leaving the backpack on the ship and taking my cameras on the Zodiac in just a simple dry bag. This worked very well, but I generally only ventured out with one camera and perhaps a second lens on these occasions.
I’m going to take my gear down to Antarctica in a Gura Gear Bataflae 26L this time, which is smaller and lighter than my Lowepro Pro Trekker 400 AW. For zodiac use I’ve ordered a Mad Water Waterproof Sportsman’s Backpack. This a not a camera bag, just a fancy but inexpensive roll-top dry bag. I’m looking at putting in some cheap padded camera inserts inside and have seen quite a selection on eBay and Amazon, so I’m going to experiment a little before my departure. I was very tempted by the new Lowepro Dryzone BP 40L backpack, but it looks rather large, is quite expensive and as yet it’s not available here in the UK.
Keeping Your Kit Dry
If your going to be photographing from the zodiacs it’s inevitable you’re going to get your camera and lenses splashed, plus you may encounter precipitation in the form of rain, sleet and snow and all at the same time! Getting your kit in and out of a camera bag in zodiac doesn’t really work, especially with 7 or 8 other photographers. You need something quick for rain or snow. A simple inexpensive drybag proved by far the quickest and easiest solution. Mine was a Exped Large (13L) Drybag and it was probably the best purchase I made prior to the trip. Be sure to have at least a couple. It was also suggested I purchase an SLR rain hood, such as the Kata E-702 PL Pro Light Rain Cover, which unfortunately I did. I can’t recommend these at all. They are bulky, awfully difficult and time consuming to put on, and make operating your camera terribly difficult, so I’d avoid these like the plague. Far better are the polythene rainsleeves from Optech, which are cheap, see through, and come in packs of two for just over a fiver. If you want something a little more substantial that doesn’t take up too much space, then check out the Storm Jackets from Vortex Media. They are rather expensive but are practical and work well. I took one with me but found the Optech covers my preferred choice. Just make sure you have them tied-on when it gets windy.
You’re going to need plenty of microfiber lens cloths to wipe the spray from your lenses, but rather than purchasing expensive ones from the camera dealers, I found microfiber camping towels far better. They seem to be pretty much the same material, lint free, and much larger. Take several, as by the end of one zodiac trip they’ll probably be wet through so it’s best to have some backups. After a while your lens front may cloud up with salt residue, so a lens spray is recommended. I used the ROR Lens & Filter Cleaning Solution which works very well.
Laptop
Last time around I took my 15-inch MacBook Pro, and backed up all my photographs each evening when on-board ship. I worked on some, but to be truthful I was so knackered each day I left most of my post processing to when I got home. I’d really like to take this again but I’m limited to only 20kg on my flight out from Chile and that includes hand luggage, so I may have to ditch the laptop this time around. If I can’t take it, I may just take an iPad instead, and take lots of SD & CF and record on both as a back up. The jury’s out on which way to go at present.
Airline Travel
The airlines seem to have become incredibly picky these days with baggage limits, and most now weigh your carry-on baggage at check-in too. This can be really problematic for photographers as our equipment is not only valuable but heavy too, and none of us wish to risk putting anything in the hold unless within something like Pelican hard case. Carry-on limits vary from as low as 6kg to 23kg, but most are around 10-12 kg. Most of us also travel with a laptop too, so with camera bodies, lenses and accessories, that can result in one pretty heavy backpack. On my last trip my backpack weighed around 16 kg (35 lbs). Of course you’re never going to get his past check-in if weighed, but there are some workarounds you can try.
My Lowepro Pro Trekker 400 AW photo backpack has a detachable bum-bag (waist-pack) which proved incredibly useful at check-in. It’s big enough to hold my 16-35mm, plus my passport and a few other odds and sods. The other trick is to wear a big coat (note: wear not carry), in my case a Begrhaus rainproof jacket, which also has large pockets, big enough to hide two other lenses. Surprisingly most airlines also allow a laptop in a slip case in an addition to your normal one hand-carry item. Thus I removed my laptop too and this never got weighed. My back weight was reduced to around 12kg and all the items were duly returned there once check-in was completed.
Of course all this regulation is complete nonsense on the part of the airlines since you can buy copious amounts of quite heavy, duty free goods when through passport control, and walk straight on the aeroplane. It’s really just a ploy to charge you more money, but I can probably envisage the day they will require us to get on the scales at check-in. Until that day arrives these ploys should work.
One other problem people will face traveling down to Ushuaia, is that Aerolíneas Argentinas have a 12kg check-in baggage limit. Luckily this seems to be rarely enforced, and my luggage, which was around 23kg was never even weighed. That aside, it’s going to be pot luck as occasionally some traveller will be charged excess. None on our trip were charged.
This trip I’m flying on Aerovias DAP from Puntas Arenas in Chile who operate a strict 20 kg weight allowance, and that includes your hand luggage. This trip is going to be a real challenge weight-wise.
New Gallery Pictures
- At May 15, 2013
- By John
- In Photographic Art, Portfolio, UK Landscape
- 0

Updated UK Landscape Gallery
I’ve at long last added several more images to my UK Landscape portfolio, which I’ve been meaning to do for quite some time. I’ve recreated a complete new set of jpeg files for the whole UK Landscape Gallery, which I thought didn’t quite look their best when viewed on-screen in a web browser, and the watermark logo wasn’t rendered so hot on some either.
Read More»Images Published in OnLandscape Magazine

Ice Jewels of Jökulsárlón 4×4 Portfolio
I was delighted to find 4 of my images are featured in the 4×4 portfolio section of the Issue 55 of the web based OnLandscape magazine. The 4×4 Portfolios feature four images selected on a “theme of some sort; that hang together in a creative way”. I chose 4 images from my visit to Jökulsárla beach at Jökulsárlón in Iceland last year, where I spent quite a while photographing ice fragments swirling around amongst the shallow waves of the foreshore of the black volcanic beach.
Read More»Drive By Shooting in the Snow
- At March 24, 2013
- By John
- In Location, UK Landscape
- 4
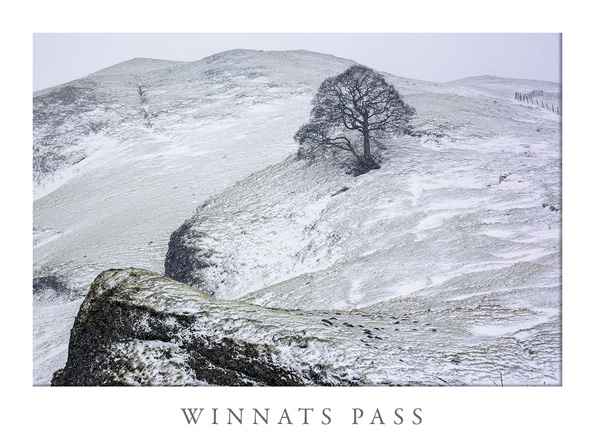
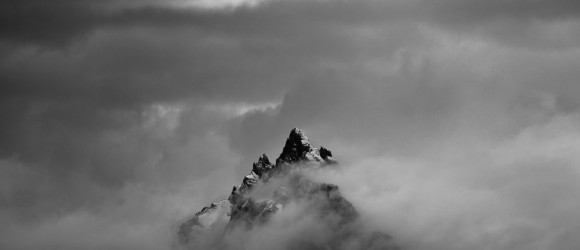
Shooting in a Blizzard
Sometimes in photography all that learned technique and acquired methodology just goes out the window and you just have to tailor your photography to the conditions in front of you. Well Friday was one of just one those of days. When much of the UK was beset with heavy snow falls, high winds, blizzards, drifting snow, and the weather forecasters were spouting amber warnings and impressing upon us not to venture out unless absolutely necessary, two photographers did just that and headed off into the Derbyshire Peak district to experiment.![]()
Autumn Reflections
- At November 25, 2012
- By John
- In National Park, UK Landscape
- 0
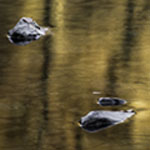

Sometimes good photographs come just by chance and that was certainly the case with this one. I’d been up in the Lake District and was out shooting with Doug Chinnery in Borrowdale. We’d just been to the quarry featured in the Joe Cornish DVD With Landscape In Mind, and although a wonderful location, somehow I didn’t feel that I bagged any particular inspiring shots, even though the location, light and autumn foliage had been spectacular. Sometimes no matter how hard you try, it just doesn’t seem to work. We’d probably spent the best part of a couple of hours at the quarry and the late afternoon autumnal glow was beginning to subside. Badly in need of a decent cup of tea we headed back down the path towards the village of Grange.
We had just descended the hill and arrived along the banks of the Derwent river, when suddenly these gorgeous golden-orange reflections from the birch tress opposite flooded across the water. That cup of tea would have to wait. I was drawn to the stones amongst the reflections so waded out into the river with my tripod; thank god for my wellies. It was obvious the light wasn’t going to last long, so I shot with the EF 24-105mm f/4.0 lens on my camera, but perhaps not the best choice but it would have to do. I took a few frames in portrait mode but they just didn’t work. Then I spotted a pattern of five stones amongst the reflections so waded a little further. I hastily put on a polarizer, ND (soft) grad upside down to balance the brightness and shot a couple of frames, but 5 stones weren’t working. I re-framed on just four stones; I just liked the way seemed to balance the foreground even though even numbers are not supposed to work. I shot just one frame then the light started to fade. I shot several more frames but the moment had gone and the glow subsided but that one frame was my shot of the day.
From my first shot to the frame above was just 5 minutes. I used a small aperture of F/22 to lengthen the exposure and smooth out the water, but that only resulted in a 2.5 second exposure. I would have liked much longer and wanted to put on a 4-stop ND but if I had I would have missed the shot. Lucky for me I didn’t.
Big Stopper Shocker
- At October 16, 2012
- By John
- In Filter, Gear, Location, UK Landscape
- 3
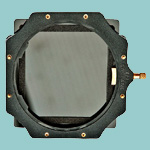
The Ultimate 10 Stop Filter

Old Pier remains at Swanage – © John R Birch
Antarctica 2011 Trip Review
- At January 09, 2012
- By John
- In Antarctica, Clothing, Workshop
- 1
This is a blog I started quite some time ago, but for some unknown reason or other it got put on a back burner and I never got around to finishing it, until now. It’s been quite a while since my trip to Antarctica and I’ve been wanting to write about some aspects of this amazing trip. I read Andy Bigg’s (one of the workshop instructors) excellent article entitled Antarctica – What Worked and What Didn’t the equally excellent Antarctica Debrief by professional photographer and fellow workshop attendee Josh Holko. It’s very much something along these lines that I wish to pervey, so this is my take on the trip in deference to the two already very well written blogs.
Read More»Voyage to Antarctica
- At November 30, 2011
- By John
- In Antarctica, Location, Travel
- 0
 Later today I board my cruise ship the Ocean Nova, to begin my 10 day trip around the Antarctic Peninsular, hopefully the trip of a life time. Antarctica is a place that has long fascinated me from first hearing the amazing feats of Ernest Shackleton in my teens, then later in my first post university job where I worked with a guy who had just spent 18 months working on the British Antarctic survey, and who’s slides I found simple amazing. Now I’m about to embark on my own Antarctic adventure as part of a 73 strong photographic party. The journey down to Ushuaia on the southern most tip of Argentina, was rather long and arduous, 37 hours from door to door, 3 flights, cramped seats and a lot of waiting around in airports, but you can’t help be impressed by this ever growing tourist destination nestled into the southern tip of the Andes Mountains of Tierra del Fuego province.
Putting in a little Effort
- At October 12, 2011
- By John
- In Location
- 0
 1029")
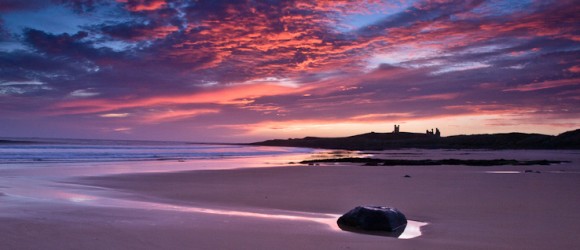
Sunrise over Dunstanburgh castle
I’ve just returned from an evening at my local photographic club where we were talking about various aspects of photography, noticeably new activities to get long term and new members to socialise more and activities to get us out doing more photography, which is after all what we are supposed to be doing. Unfortunately our club is a little too fixated with club competitions. At the beginning of each new season potential new recruits arrive hoping to learn more about photography,
Read More»Mormon Row (When It All Comes Together)
- At September 05, 2011
- By John
- In Location, National Park, USA Landscape
- 1
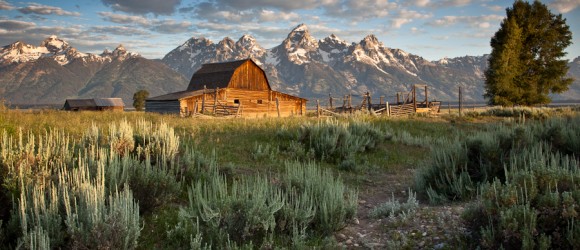
A Classic Location within the Grand Tetons NP

Mormon barn set against the Grand Tetons – © John. R. Birch 2011 – (click for larger view)
You know the problem, as I’m sure I’m not the only one. You set out out on a photo-shoot to a great location, arrive in good time, get a great spot, set up you gear, and carefully compose your frame. Then by some magic of nature, that fantastic light you’d dreamed of suddenly appears and the scene before you is transformed. You snap away with merry abandon, filling up the memory card with an abundance of frames, not wanting to miss every subtle change in the light, thinking you’ve definitely bagged a winner since it looks great on the LCD. But then you get home and
Read More»