
Shooting the Aurora
- At January 19, 2014
- By John
- In Aurora, Iceland, Night Photography
 4
4
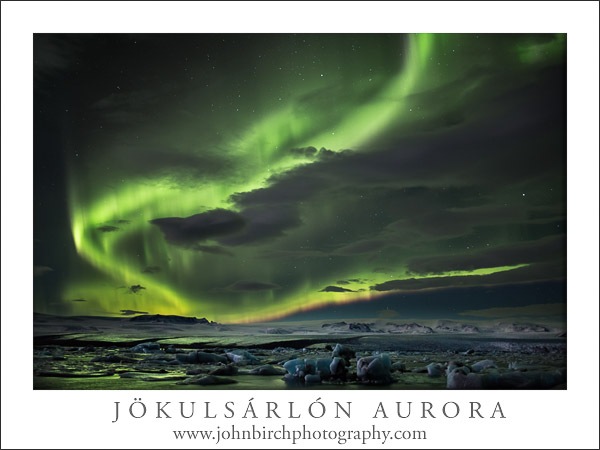
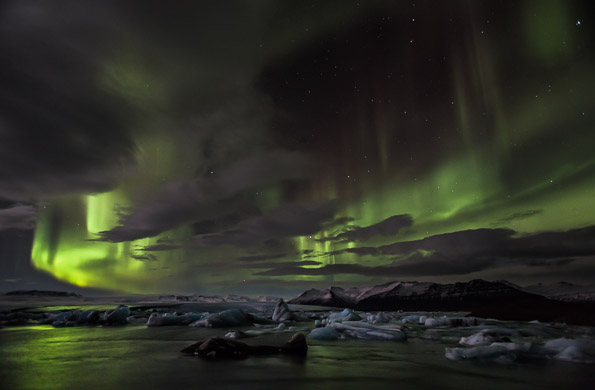
I’ve just returned from a fantastic eight day photographic workshop in Iceland where we were blessed with some amazing light, wintery conditions and my first experience of the Aurora Borealis, a.k.a. the Northern Lights. Although I knew there was a chance we could see the Aurora, it’s not something I’d particularly got my hopes up for. I know many trips end in disappointment as getting all the conditions right, clear skies, aurora activity and great location, seldom coincide. Well I have to say we were pretty dam lucky, as we were treated to one of natures amazing light displays over the glacial lagoon at Jökulsarlón at our very first attempt.
We’d had a terrific days photography too, starting in a fabulous ice cave underneath the Breiðamerkurjökull glacier, followed by great light and reflections on the Breiðamerkurlón glacial lagoon. The Aurora forecast for that evening was only at level 3 (on a scale of zero to 9), which equates to just moderate, and cloud cover was predicted too, so we weren’t expecting much. but we were bowled over at what we saw that evening.
Aurora Shooting, First Attempts
When we arrived there were several other photographers around, and although I aware of some activity in the sky it appeared dull and grey to my eye. Definitely not the bright green I’d expected, yet the other photographers were whooping and hollering. Then I shot my first frame and whoa! Bright green streaks on my LCD. It looked amazing. What you see on your camera LCD is not what you can see with the human eye. This is because in low light the human eye sees in monochrome whilst the camera records in full colour. It was only when the intensity and brightness of the aurora increased that I could actually make out some green in the sky, and even then it was nothing what like the camera can detect.
I used a Sigma 35mm f/1.4 DG HSM lens for most of my shots, purchased prior to the trip especially to capture the aurora. The aurora dances around pretty quickly so the faster your shutter speed the more of the aurora structure you can capture, rather than getting just a blur, especially with those fabulous curtain effects with vertical streaks. I shot using a pretty high ISO setting of 1600 but afterwards wished perhaps I’d dropped it to ISO 800 as my shots were very noisy. These were smoothed out as best as possible by the noise removal in Lightroom which does work very well, but I found I had to use setting of 25-35, which I’d never reach on a day light shot. Shooting at ISO 1600 did allow exposures as quick as 1.6 seconds at f/1.4. I did however, find the field of view on the 35mm just a little to restrictive for most scenes as often the Aurora often filled the sky I later switched to my 16-35mm, resulting in 4 to 6 seconds exposures. I shot using aperture priority and found the shots looked best slight under-exposed.
Focusing Issues
I’d been advised it’s best to focus on Infinity, but autofocus lenses rotate past infinity, so it wasn’t as easy as I’d thought, especially when you’re fumbling around in the dark. I had to experiment with lots of shots to get the sky and stars sharp without blurring the mountains and foreground too much. However, as sharp as I thought I’d got the mountains on the LCD screen, they appeared soft when viewed on my desktop PC screen, and the foreground ice very soft. Luckily the skies and starts all seemed sharp but my results are not images I’d risk printing too large. My autofocus lenses have an L-shaped mark for infinity, but I found one lens was best just a smidgen past the mark and another lenses a tad behind, so I had to experiment. I’d heard of focusing on the moon or setting up in daylight and taping the focus ring down when set to avoid it moving, but none of these methods were an option at the time. It seemed best to set the lens at the L-mark, start shooting from then, move focus very slightly. It took a while to get it right and I did knock the lens out of focus at some point too, so had to do this several times, which was very frustrating.
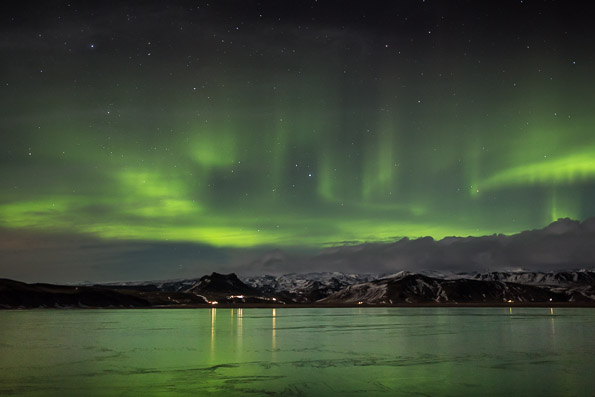
Aurora at Dyrhólavegur, near Vik on the second night
One of the workshop participants, Mark, had brought the Zeiss Distagon, 21mm, f/2.8 lens, which is a manual focus lens. The advantage of this is that the focus stops dead on infinity. Not only is this a crackingly sharp lens, but achieving focus at infinity was a breeze, and therefore probably a far more productive choice of lens. It may be an expensive option, a stop slower than my Sigma 35mm f/1.4, but if you’re serious about aurora photography then a good, fast, manual focus lens may well be a distinct advantage.
Avoid Filters
Mirco-concentric interference rings caused by my UF lens filter (click to see at 100%)
When processing my pictures later on my laptop, I noticed many exhibited a series of small concentric rigs at the centre of the image. I’ve since learnt that this is caused by having a filter on the lens, which should be avoided at all costs. I had a good quality, brand new B+W, UV filter on my 35mm f/1.4 lens. It occurs on all the images with the filter unfortunately, but is more pronounced if the centre of the image is bright. Thankfully it hasn’t ruined all my shots, and I didn’t have a filter on the 16-35mm lens (but only because it got stuck in my Lee adaptor ring!). Noise removal and some subtle blurring lessens the effect do some degree, but sadly it did ruin quite a few shots. It’s not so noticeable in the jpegs presented here, and I have not yet to make some test prints to see if I can get away with it. The rings are apparently interference fringes caused by the parallel face of the filter to the lens and the narrow spectral emission of 5577 Angstroms of the green, atomic oxygen, emission line which is the strongest emission in the aurorain the aurora. A lesson learned.
Aurora Virgin No More!
I really didn’t expect to see the aurora on this trip. I’d known so many people making specialist trips only to come away extremely disappointed. However, I now know what’s all the fuss is about. It’s simply amazing. We we’re very lucky as we treated to another show at Dyrhólavegur the following night and whilst no where near as intense it was still beautiful to watch. The rest of the week was cloudy and activity low. Can’t wait to do it again though!
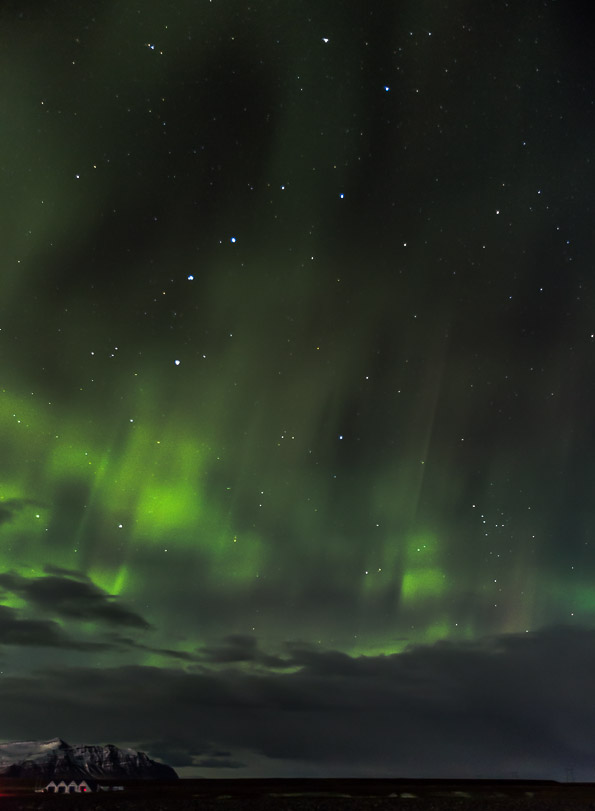
Aurora and the Big Dipper (Ursa Major) at Jökulsárlón.
Reza
Great read. Thanks for sharing. I am seriously thinking of getting either a 35mm f1.4 II or 16-35 f2.8 II USM. Very difficult decision. I do landscape photography and panoramas mostly , and some night sky. I heard very positive feedbacks for 35 mm f1.4, but am afraid the closer objects (lakes , grass) will show too soft at f1.4-f1.8 (which is the main pint of buying this lens.) What is your experience?
(I use a EOS 5D MKIII)
John
Hi Reza, I wouldn’t be too bothered about objects close to the lens, they are going to be soft. You’ve got to focus at infinity. My personal preference would be to go with the faster lens and shoot wide open, although 35mm is a bit limiting in field of view compared to a 24mm. The shorter your exposure the more of the vertical curtain effect of the auraora you’ll pick up which make better photos. Longer exposure will just produce a green blur effect. I’d also go for a manual (not autofocus) lens if it’s good shots of the aurora you want. The reason being is that they stop exactly on the infinity setting. Autofocus lenses can rotate past the infinity setting and although it’s marked it’s incredibly difficult to set it exactly, especially in the dark. I’ve heard some photography workshops get their participants to set their lenses to infinity in day light and then tape the setting with gaffer tape. I also found the infinity mark on autofocus lenses is seldom precise, and it could be just behind or ahead of the mark. Hope rthis helps.
Doug Chinnery
Oh, my word – looks like you hit the mother lode!
Pete Hyde
An interesting and informative read, John and some wonderful images. I had exactly the same problem with a UV filter when in Norway. Fortunately I saw the effect after our first aurora shoot and we were blessed with a second one.