
Windows 7 – is it worth it?
- At December 07, 2009
- By John
- In Software, Windows
 0
0

Software Review
I don’t know about you but I have found Vista to be the most frustrating Windows system I’ve used to date, and I’ve used almost all Windows versions since 3.1. I’ve had more crashes, BSOD’s (blue screen of death) and system hang-up’s whilst using Vista than I’d care to shake a stick at and at times I’ve sworn I’ll never touch another dam Microsoft product ever again. There’s no two ways about it, Microsoft well and truly lost the plot with Vista and have alienated more users than anyone thought possible.
Read More»False Kiva, Canyonlands
- At November 20, 2009
- By John
- In Location, National Park, USA Landscape, USA Southwest
- 1
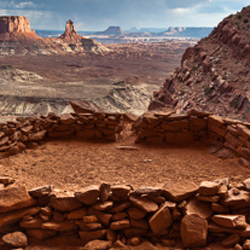
A Classic Photographic Location – False Kiva

False Kiva, a hidden gem in Canyonlands – © John R. Birch 2009
Lightroom 3 Beta Release – First Impressions
- At November 05, 2009
- By John
- In Lightroom, Software
- 0
Software Review
 I was quite surprised, like many others no doubt, to find out last Friday that Adobe had released a beta version of Lightroom 3 just 15 months after the full launch of Lightroom 2. They certainly managed to keep that one quiet! Lightroom has become my software of choice for DAM and RAW processing and I’ve used it from the very first beta release of version 1, so I was very keen to try out the new LR3 beta version. Some of the new features touted by Abobe are as follows:
- New performance architecture, to allow for growing image libraries
- Noise reduction for high ISO shots
- Watermarking tool
- Portable sharable slideshows with audio—designed to give you more flexibility and impact on how you choose to share your images, you can now save and export your slideshows as videos and include audio
- Customizable print package for custom print layouts
- Film grain simulation tool
- New import handling dialog
- More flexible online publishing options including ability to post images to sites such as FLICKR
Needless to say, after only a day or two there are already a substantial number of detailed reviews, first looks, videos and blogs (some of which I listed below) out there already. Most of these I suspect, have been posted by members of the Alpha testing group who are able get their hands on new Lightroom versions long before the general public do. Funnily enough I’ve only seen Michael Reichmann admit to being an alpha tester.
First Impressions
Firstly, I’ve only had a weekend so far to look at LR 3 beta so these are my very first impressions. When I first saw the list of improvements and new features from Adobe I can’t deny I was a tad disappointed. Where were Soft Proofing, Lens Distortion Correction, Perspective Correction, and a decent Keyword Manager? These were all around the top of my list of improvements, and plenty of others from what I gleaned from the various forum and web postings. I can’t say Film Grain Simulation, Exporting to Flickr and Watermarking were anywhere near getting on my list, so I really can’t understand why any time has been spent on these rather trivial features. However, this is by far from the finished package, and like the release of LR2, I can only assume they are saving the best till last. At least I truly hope so. Lets take a look at some of the headline changes.
New File Import Dialog
Well it’s called a dialog box, but it’s long, thin, very dark, has rounded corners, has a horizontal work flow and dims the rest of your screen when it’s opened. It’s quite unlike any dialog box I’ve seen before. In fact once expanded, it bears a more resemblance to a Lightroom module rather than a dialog box and has side panels and even a flourish! So just what is going on here?

Well there is more functionality perhaps, but I’m really not sure about the way it’s been presented. What’s the old adage “If it aint broke , don’t fix it”. There was absolutely nothing wrong with the old import dialog box in LR2 and I wasn’t aware of any significant proportion of users reporting problems with it. It performed admirably in my book so I have to confess I’m rather surprised time has been spent on developing this. You can however, you can have far more thumbnails visible (albeit with some weird vignette applied) and zoom in on photographs before importing them, which is perhaps a good thing. However, the way this is now presented, it’s now surely an Import Module, and is no longer a dialog box. If that’s the case may be we should be seeing it as proper module and listed on the Module Picker.
I can understand why Adobe have gone with the dark colour, so you can judge your colour photographs against a similar background before importing them. However if it’s going to be a dialog box, make it look like the others please, remove the stupid corners and make it match the other dialog boxes, lets have some continuity through out LR. As presented here it now looks very much like a bolt-on application and I truly hope the rest of the dialog boxes within LR are not going to end up looking like this.
RAW Processing
We’re promised faster and better RAW processing as the desmosaic engine for LR3 has completely been re-written from the ground up. However, being a PC user it’s not easy to determine, as this version seems optimised for Macs not PC’s. Just read the feedback on the forums already and you’ll see what I mean. Fast on a Mac, slow on a PC. I guess that’s understandable as I’m sure LR3 Beta is probably developed on Macs and then ported to PC’s, and who can blame Adobe when you have the awfully sluggish Windows Vista to deal with.
My primary catalog has in excess of 100,000 photo files now, and it’s got to the stage where the size of the catalog has effected the speed of my workflow even on a quad-core 64 bit system running at 3.2 gHz, so speeding up my catalog is another key feature I was looking for. Unfortunately you can’t import your existing LR2 catalog into LR3 beta so I can’t test this feature. To import files and preserve your existing LR2 modifications you have to first save your edits as XMP side car files (Save Metadata to File from the Metadata menu in the Library module or via CRTL+S) and then read them back in once you imported the files into LR3 beta (Read Metadata to File from the Metadata menu in the Library module or via CRTL+R). Unfortunately there is a bug that prevents the user importing more than one folder at a time. Thus it’s highly unlikely I’m ever going to import my whole catalog folder by folder to test this feature.
I’ve tried a few side by side comparison of how LR3 beta processes RAW files as compared to LR2 and so far I can’t tell that much difference. On a few it definitely seems better, much smoother, but oddly quite a few of my pictures were rendered noticeably darker but I suspect this is something to do with a change in the way post crop vignetting works. It’s a bit too early to for me tell.

If you import a picture processed in LR2 you will see a little grey alert icon above the histogram on the left-hand side in the Develop Module. To take advantages of the the new LR3 beta process engine and controls such as the new noise control, and new post crop vignetting, you’ll need to click on this to upgrade. You can also choose which process version to use from Settings | Process Version.
Noise Reduction
The Colour Noise Reduction algorithm has been re-written for LR3, but if you elect to use the LR3 beta process engine you’ll find the Luminance Noise Reduction option greyed out. The latter I guess is still work under progress. The Colour Noise Reduction is supposedly greatly improved, with criticism of the old version being that it tended to soften your image too much. There is a noticeable improvement with the Colour Noise Reduction but I, like most I suspect, have used well established 3rd party products (in my case Noise Ninja Pro) which have provided sophisticated results and provide the ability to apply selective noise reduction to different parts of the image. Unless the final release of LR3 intends to add noise reduction to the brush tool I see little here to threaten the wide use of the third party products or alter my existing noise reduction workflow.
Custom Print Package
Lightroom 3 allows custom print layouts which gives much more control over your print layout, and you can even add colour backgrounds if you wish. This is some welcome additional functionality, but what we really want is the ability to add custom borders, frames, mattes and text.
Watermarks
Watermarks have been improved..a little. You can apply text or graphic and adjustable size, position, and opacity.
Other Improvements
At long last you can now choose to backup your catalog when you exit Lightroom rather than the next time it starts. You can sort Images by aspect ratio now too. You can also now create a collection directly within a collection set by simply right-clicking on the collection set, and you can now select to have an icon displayed on the grid thumbnails to indicate that image is part of a collection. One other point that pleases me is that filters are no longer ‘sticky’ to a folder or collection. Many’s the time I’ve returned to a folder and wondered where many of my photographs were only to eventually remember I had some filter applied. Catalog file optimisation is now selectable from the File menu rather than been hidden. Some of the more popular print sizes have been added to the crop presets, although I’m sure most of us will have already have created our own. You can also export your slideshows as movie files, even in full HD at 1080p. Post cropping vignetting has been modified ability to select either Highlight Priority or Colour Priority, and can produce a more pleasing effect. You can also now add grain to your pictures, to emulate film grain. I thought this a rather odd function to add as it’s normally the realm of Photoshop or third party plug-ins to provide these type of features. May be this is a sign that Adobe are eventually going to add some of the functionality oh Photoshop to LR. I certainly hope so, the less Photoshop the better as far as I’m concerned. There are also many other minor improvements that I’ve not yet had time to investigate.
What other features can we expect?
I guess I’m really hoping that this is not it, as I suspect there are not nearly enough new features to temp the majority of user to upgrade based on this feature set alone. As with the release of LR2 I’m pretty sure Adobe will have kept one or two barnstorming features for the final release that will tempt even anti-upgrade stalwarts to relent. As Tom Hogarty stated in his Lightroom Journal blog “We’re not even close to finished in terms of features” and this is reiterated in Michaal Reichmann’s review on the Luminous Landscape. I guess we’ll just have to wait and see.
Lightroom 3 Beta Resources
Download Adobe Lightroom 3 Beta from Adobe Labs
Adobe Lightroom 3 Beta Release notes
Lightroom 3 Beta Learning Centre
Lightroom 3 Beta First Look – Luminous Lightroom
Lightroom 3 Beta Tutorials – Juleanne Kost
The Magic of Mono
- At October 22, 2009
- By John
- In Location, USA Landscape
- 1
Photographic Location
+1172.jpg)
It is a lake that is not without controversy either. Back in 1941 the Los Angeles Department of Water and Power began water extraction which was to eventually exceeded inflow and as a result the lake level began to drop. By 1982 the lake surface area had been reduced by over 30 percent. This also began to expose submerged tufa towers; large limestone spires formed by calcium waters transported to lake bed by geothermal springs, reacting with the salt-rich lake waters and depositing layer-upon-layer of calcium carbonate over time. It also drastically effected the salinity of the lake, exposing salt rich deposits to erosion and now the lake is 2½ times more salty than the ocean. Not much can survive in that, and not much does (there are no fish), however the lake is home to Artemia monica, a tiny species of brine shrimp, no bigger than a thumbnail, that are entirely unique to Mono Lake.
Local inhabitants formed the Mono Lake Committee in 1978 and many years of legal proceedings and representations followed which have eventually resulted in a directive to reduce water extraction and (hopefully) eventually return the lake to it’s former levels. However the battle still continues on.
Mono Lake and the surrounding area provide a truly unique and interesting landscape but it is the tufa towers that provide great interest to photographers. I’d past through Lee Vining briefly back in 1984, but never visited the tufa areas, now designated as a California State Reserve Park. The Mono Basin Scenic Area Visitor Centre, just off Highway 395 to the north of Lee Vining, includes a variety of exhibits about the natural and human history of the Mono Basin and is a good place to research your photographic location if you have time beforehand. The best area for photographers is South Tufa, on the southern shoreline, where are tufa spires up to 30-ft high and ranging in age from 200-700 years old are exposed, providing a surreal landscape. I didn’t have the luxury of a reconnaissance trip before my dawn shoot, so it was up at 4:30 am and a drive out in the dark for me during my summer 2009 visit.
+1155.jpg)
As I drove out from Lee Vining and turned onto highway-120, there was a beautiful pre-dawn red glow reflected in the lake that made it seem like it was on fire and I began to wonder if my 4:30am alarm call had been early enough. There were other cars in the car park too, so I set off briskly down the wooded walkway in the dim, pre-dawn light with my head torch lighting the way. It’s quite strange visiting a location for the first time in the dark (not the best thing to do), but I didn’t have the opportunity to explore the day before and I could just about make out the shadows of the eerie tufa spires all around. I found three other photographers with tripods already set-up at the beach at the end of the boardwalk, so I set up beside them and began to chat. Luckily for me one turned out to be Ralph Nortstom, a delightful chap, and professional photographer conducting a small workshop. Ralph was kind enough to give me some pointers and shortly I was snapping away with the rest of them. You can smell the salt at Mono lake and as it got lighter I became aware of the millions of lake flies floating on the water and along the shore line which ripple away in vast waves as you walk towards them. Thankfully they don’t bother or bite. As the light gradually increased I became aware of many other photographers arriving and others scattered amongst the tufas. I must have counted over 30, so this is definitely a very popular spot. I went for a walk eastwards through the large shore bound accumulation of tufas and tried several other spots, but soon the good light had gone, but I found exactly the right location for my shot for the following day.
+1152.jpg)
The next morning I was first to arrive, but the pre-dawn glow didn’t seem anywhere near as intense as the day before. The sky was cloudless again too. It was so much easier to find my location this time; it certainly pays to investigate your location beforehand if you can. I had envisaged catching silhouettes and shadowy reflections of a tufa island just offshore looking eastward into a red dawn glow. Despite the lack of brilliance, stopping down increases the saturation and as the light increased I used graduated ND filters to hold back the sky and balance it with the reflections within the lake. I also tried additional ND filters to lengthen my exposure time to smooth out the surface of the lake, an effect I quite like. Soon the golden light had faded and I tried other shots. There are so many unusual shapes within the tufa you can spend ages here. It’s a wonderful spot and I was really pleased with my shot. I hope you agree.
How to Get There
Recommended Links
Photographic Locations nearby
Bodie State Park – quite probably the best ghost town of all.
Sand Tufas near Navy Beach
Where the #%*! are my Pictures?
- At October 13, 2009
- By John
- 0
Video Review: Guide to Assett Management – Where the #%*! are my Pictures?
By Michael Reichmann & Seth Resnick

If you are into photography and have never visited the Luminous Landscape web site then shame on you. Do so immediately; it’s just about THE best resource for almost anything photographic and there will be something of interest to just about every photographer no matter what format you use. It’s run by the Toronto based photographer and photo journalist Michael Reichmann, a veteran of over 40 years within the industry. However, he is not the sole contributor, far from it in fact, and you will find articles from many other well know photographers and industry related personnel too. It’s not just the equipment reviews, tutorials and photographic tips that make this site rather good, but rather uniquely, it also provides downloadable video journals and tutorials, and it’s one of the latter that I want to talk about today. Ah! I here you mutter, other sites have downloadable video tutorials too…not like this they don’t!
Michael is one of those photographers who is ‘in the know’, an A-lister if you like, and a member of that fraternity of photographers that has access to not only to the boys at Adobe, but is well enough respected by the industry to get to do hands on reviews of the latest equipment releases typically long before it’s let loose on the general public. His tutorials are not some 3-5 minute clips either, but generally comprise a whole DVD’s worth, set out in several chapters. The videos are hi-res downloads (1080 x 720) and are typically co-hosted, in many cases with Jeff Schewe, but in this particular tutorial Michael teams up with fellow photographer and DAM guru, Seth Resnick a Florida based photographer.
So what is Where the #%*! are my Pictures?, and why should it be of any importance to you? Well it’s a tutorial of Digital Asset Management (DAM) and if you shoot digital and have amassed great quantities of digital images that now litter your hard drive (or hard drives!), then this should be of interest to you. I consider myself to be pretty well tuned up to DAM. I’ve researched it on the net, read books on it (The DAM Book by Peter Krogh is a fine example) and have used Adobe Lightroom since it’s inception to manage and keyword my image library, which includes not only digital images, but slide, negative and photo scans. So would I learn any thing new?

First of all, like most of the videos on the Luminous Lightroom, this is a large download, consisting of 2.9 GB in 9 files, comprising 11 video sections, each in 1080 x 720 resolution. The program starts with an introduction to the concept of Digital Asset Management and stating why you may need this even if you think you don’t. The format takes the form of a general but light hearted discussion between Michael Reichmann and Seth Resnick, with Seth presenting his strategies and Michael asking the questions a typical user would ask, and prompting for clarification where he thinks necessary. The whole program is focused on Digital Asset Management within Adobe Lightroom, but don’t let this put you off even if that is not your preferred choice software, as many, if not most of the methodology is applicable in many other scenarios. The tutorials are well presented and even entertaining, and Seth comes across as been quite obsessive (he uses another word) particularly about his key wording and back-up regimes. There are sequences on file organisation, importing and naming conventions, editing selection and ranking, captions, key-wording, and filtering with metadata. He then goes on to explain how to take a remote catalog on the road and yet still be able to work with all of your files, and then covers XMP sidecar files and the DNG option, before finishing up with archiving and backup. There is a lot of stuff covered here and while you may not particularly agree with, like or even need all of the detail and degree into which Seth goes for your own particular photo library, there is some here for everyone and I can almost guarantee it will change the way you manage your photographs.
I was quite surprised by this video. I didn’t buy this for quite some while after it was available, as I thought I had DAM pretty much sown up and that I didn’t need this. I was wrong. I got much more out of this that I thought possible. If you’re a Lightroom user then this will be of particular appeal. It is informative, entertaining and enjoyable. Guide to Asset Management – Where the #%*! are my Pictures? is available as a $29.95 download from the Luminous Landscape website store.
Now if any tutorials turn up with Michael, Seth and Jeff Schewe all together, I’d buy it no matter what, just for the entertainment value, now that would be a prospect!
By the way, I’ve acquired all Michael’s video journals. If a number of you are interested in a particular journal, send me a request and I’ll consider a review.
Back up Devices – The Drobo
- At September 20, 2009
- By John
- In Gadget, Gear, Gear Review
- 0
I can’t stress the importance of backing up your data and image files as in the past I’ve been guilty of not doing this on a regular enough basis, and I have almost paid the price. I went for years without any hard drive failures at all, and was lured into the false sense of security that these devices were almost infallible. However, in the last year I’ve had 4 hard drives fail, and these were
Read More»The Eagle and the Snake
- At September 20, 2009
- By John
- In Uganda, Wildlife
- 0
I’ve been lucky enough to work in Uganda over the last couple of years and this has given me the fantastic opportunity to photograph some of Uganda’s amazing wildlife.
I certainly don’t profess to be any sort of bird or wildlife expert, far from it in fact, and before working in East Africa I could hardly tell one bird species from another. However, when it comes to birds of prey, even they generally grab the attention of many a non-ornithologist.
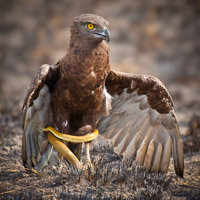
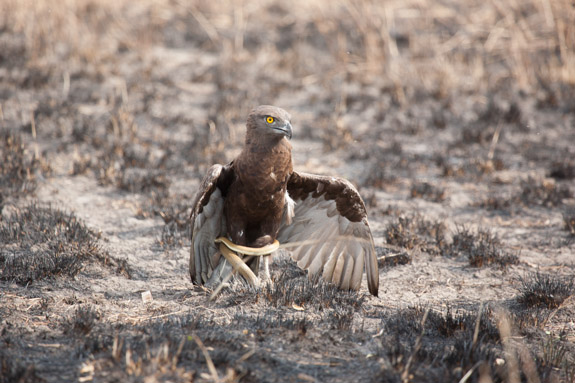
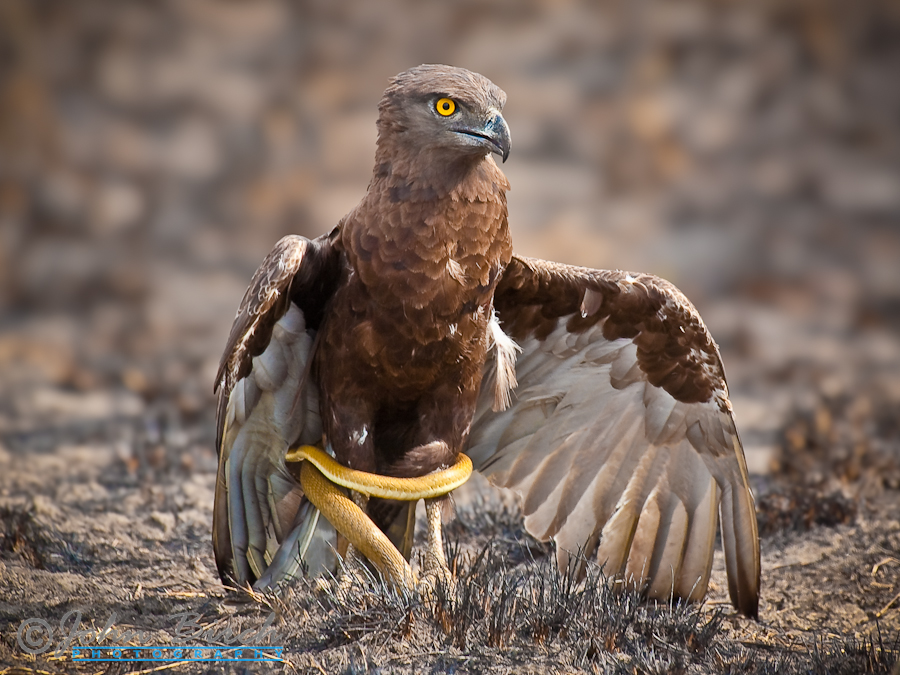
The best photographs require a high degree of luck and this one was no exception
As they generally say, the best photographs require a high degree of luck and this one was no exception. A friend and I had gone for a drive within the Kabyoya Game Reserve, a small region around Kaiso on the eastern shore of Lake Albert in Albertine Rift valley of north west Uganda. We were not far from the Lake Albert Safari Lodge and much of the surrounding high savannah grass had been burnt to the ground in the annual burnings. This is a good time for the raptors, as their normally hidden prey is revealed and less well camouflaged against the blackish brown, scorched earth and stubble. Prey is on the move too, trying to escape the encroaching fire. The Brown Snake Eagle was spotted perched upon a tree top and we pulled over to take some photos. My fellow photographer sported a Pentax with 50-500mm Sigma zoom lens, me with my trusty Canon 5D and my EF 100-400mm, f4.5-5.6 Zoom. Contrary to most wildlife blogs we don’t have time for tripods and hours of waiting, with just an hour or two to catch what we can. Everything is shot hand-held from the vehicle window. Image stabilisation (IS) is invaluable.
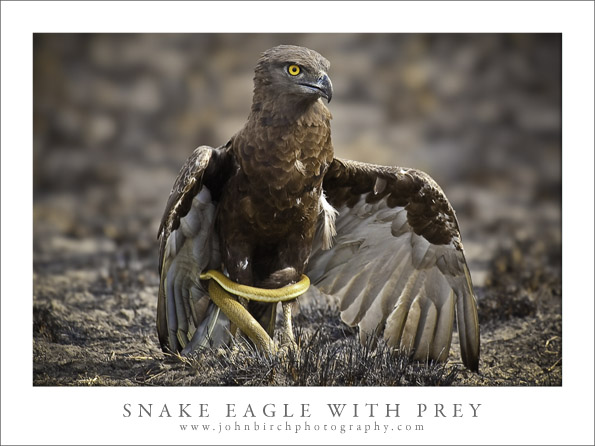
A Fleeting Glimpse
I only managed to fire off a couple of frames (being on the passenger side) before the eagle took flight. Another disappointment. We drove on, just passed the tree, when suddenly we were aware of a faint flash of something light coloured off to the drivers side, the next thing I hear is “It’s got a snake!“. The eagle had swooped down the other side of the tree and caught a cobra; the flash being the underbelly of the snake as it writhed around the Eagles talons, one talon firmly fixed upon the cobras head. We pulled up as close as we dare and started shooting as fast as possible. I had to shoot across the driver so there was no time for even thinking about composition, just grab the photo. I managed to bag 18 frames during which the eagle bit off end of the snakes tail, cloaked it’s prey, then flew off back to the top of tree grasping the wriggling cobra. I kept my camera set on AV (aperture priority), aperture wide open at f/5.6, with only the centre focus point enabled. I tried to focus on the eye and quickly re-frame. It usually works .. some of the time.
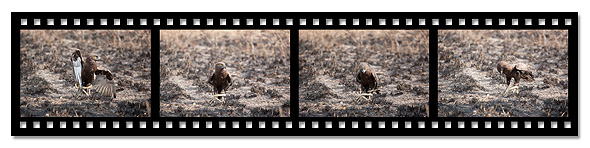
Initial Disappointment
Original RAW capture
I was pretty sure I’d bagged a decent shot but joy turned to bitter disappointed when I viewed the frames in Lightroom later on. A long blade of dry, parched, unburned grass, arched over and blurred, appeared in the foreground of every frame, passing right across the eagle. Of course I didn’t even notice that when shooting, my eyes and lens just focused upon the eagle. The burnt stubble in the background was almost as dark and a similar colour to the bird, so the frames lacked contrast. Several frames were too blurred and beyond redemption and none of the snake parts were in sharp focus. They seemed like a lost cause.
Re-processing worth the Effort
Several months later however, I took another look at the images. They really they weren’t that bad. Perhaps I’d been too critical at the time. It was OK that the snake wasn’t that sharp, as long as the eagle was. Now I’m not usually one for spending time attempting photo-manipulation in Photoshop; I’m not particularly great at it, and more often than not it never quite come out looking right. However, this was one time to try. I patiently cloned out the offending blade of grass, together with a distracting leaf in the foreground, adjusted the contrast, clarity, vibrance and saturation to make the bird’s colours stand out as much as I could against the brown background. To finish off I applied a gradual blur to the background to accentuate the lens Bokeh, sharpened the eagle and cropped the frame. This did the trick. Now I had an exciting wildlife photograph, one that I was more than pleased with.
Mesa Arch – The Photographers Holy Grail
- At August 31, 2009
- By John
- In Location, National Park, Travel, USA Landscape, USA Southwest
- 0
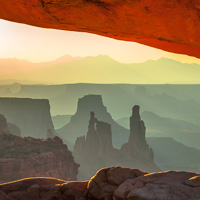
An Iconic Location of the American Southwest

Mesa Arch Sunrise
We’ve all seen hundreds of pictures of Mesa Arch in Canyonlands National Park in Utah. It’s an iconic image and a location that is hugely popular with photographers from all over the world. You may well think it’s been over-photographed, but the temptation to add this to your portfolio if you get the chance is just too good to an oportunity to miss. It’s almost the holy grail for photographers and besides, for amatuers like myself it’s a chance to compair your own results with the big boys and see
Lightroom Tip – Panel End Mark Star Ratings
- At August 10, 2009
- By John
- In Lightroom, Lightroom Tips, Software
- 0
Make Use of Your Own Panel End Marks in Lightroom
I can’t remember where I saw this simple, and very effective tip, but it’s one I’ve found particularly useful so I like to present my particular take here.
I’ve must admit I’ve always found the Panel End Mark displayed at the bottom of each panel rather odd. They seem rather superfluous and in total contrast to the sleek streamlined interface displayed elsewhere throughout Lightroom.
Read More»